These biscoff truffles are really easy to make with just a few ingredients but look and taste like a wonderfully indulgent treat. They make great gifts, festive treats or really any excuse you want to find to enjoy.

This post may contain affiliate links, where we earn from qualifying purchases. See more details in the policy page.
If you are a fan of those lovely little spiced cookies you sometimes have with coffee, then you'll no doubt love these cookie-based truffles. In some ways you might call them a cross between a truffle and a cookie dough ball, but either way they're incredibly tasty.
I've seen some versions use cream cheese in the filling, but I've kept things super simple here with cookie crumbs, cookie butter and just a little butter. That way, you don't have any flavor distractions, just the delicious biscoff spice flavors. Well, apart from the chocolate on the outside but that just makes them extra special.

Lotus, biscoff, speculoos or speculaas cookies?
You may have heard a few names for the cookies/biscuits that are the base for these truffles. And the various names can get confusing. Lotus is a cookie/biscuit producer from Belgium and simply the brand name.
Lotus are best known for making speculoos cookies commercially and in many countries, including the US, these go by the name "biscoff". So Lotus biscoff cookies are the same as speculoos, the name they go by in Belgium.
Speculoos are a more modern variant on speculaas which are very traditional spiced cookies/biscuits from the Netherlands and Belgium. They are also known as windmill cookies since they are often made with a windmill-shaped mould.
These days, the names might be used interchangably, or speculoos used for the commercial version. Originally, speculoos were less spiced than speculaas and so more affordable than speculaas which contained a wide variety of spices, much like gingerbread.

Ingredients for these biscoff truffles
For these truffles you simply need crushed biscoff cookies, biscoff cookie butter, a little butter then chocolate to form the outer coating. That's it! As mentioned, I know some use cream cheese to help hold the filling together but I much prefer the cookie butter as it adds more biscoff flavor rather than detracting from it.
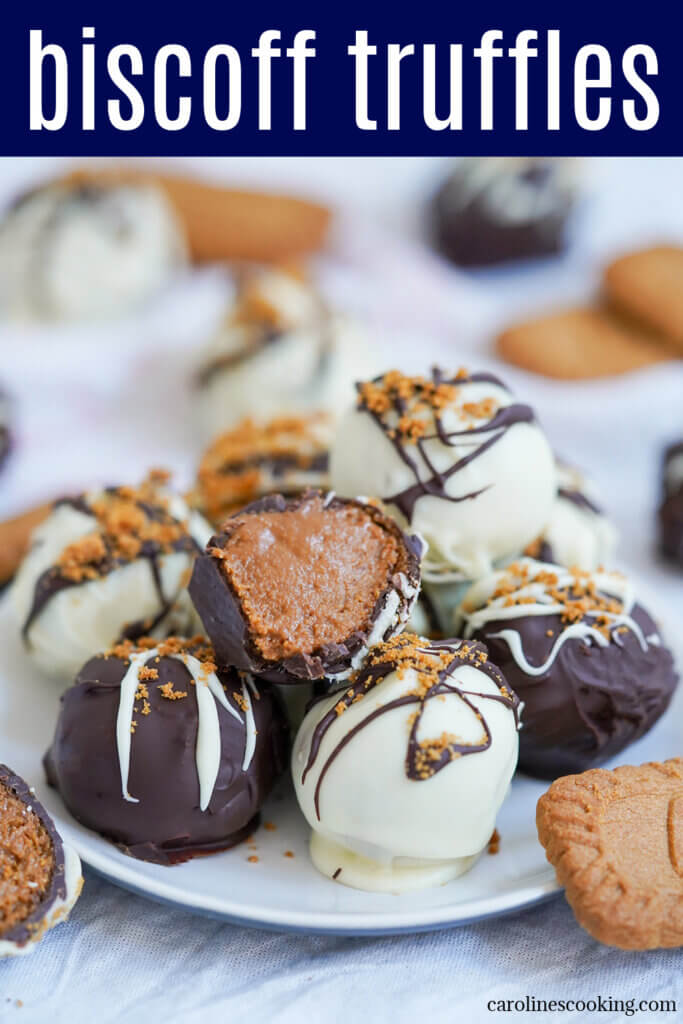
I have dipped some in dark chocolate and others in white chocolate. I then used the leftovers from each to drizzle the contrasting color over the top. You can do the same, or just use one type of chocolate, as you prefer.
Personally, I am not a huge white chocolate fan - I find it way too sweet - so the dark chocolate is far and away my favorite. But I taste-tested these on a few people and some others preferred the white chocolate version. The beauty of having both is it gives choices. And the contrasting drizzle hides any uneven dipping (as I for one admit it's not my strong point!)

Tips for making these
These are easy to make, but a few tips will help them come out their best:
- Using a food processor helps make the cookies into crumbs really quickly, and also mixing in other ingredients. However you can also crush by hand (place cookies in a bag, seal and crush with a rolling pin or similar).
- Make sure you chill the filling mixture before forming balls.
- Use a measuring spoon or small cookie scoop to help form even amounts.
- Freeze the balls of filling before you dip them so they are firm. You can also re-shape them part way through freezing if needed, as sometimes they flatten a little.
- When you melt the chocolate, I suggest you either use a bain Marie/double boiler or melt in the microwave. In both cases, stir now and then and stop when almost melted and let the heat melt the rest.
- Use a fork to help remove excess chocolate before letting them firm up on a lined baking sheet. If the chocolate gets too thick/firm, re-melt as needed (and re-freeeze the filling balls as you do so to make sure they stay cool and firm).
- Re-melt leftover chocolate after dipping to give you a little more to drizzle on top. If you are adding extra biscoff crumbs for decoration, crush them first and add immediately so they stick.
While there's a little waiting time here and there, the hands on time is minimal. The hardest part is probably the dipping, but even then, as I say it's not the end of the world if they aren't perfect. Especially if you add a drizzle which helps hide less smooth areas.
Storing
I recommend storing these in the fridge in a sealed container. They will keep for at least two to three days that way. Personally I like to eat them right out the fridge but you can also let them come to room temperature, too.
While you can keep them out at room temperature for a little bit of time, the filling gets softer the longer it is out. And you definitely don't want them too warm or the chocolate will melt, too.
If you're a fan of homemade truffles, why not also try my cranberry truffles and these lemon truffles. And biscoff are great in other dishes too like this no bake biscoff cheesecake.

These biscoff truffles are an easy, fancy-feeling treat that are sure to be a crowd pleaser. With just a few ingredients, the end result has such a delicious contrast of flavorful filling with a crisp chocolate coating. The fillings soft, with a slight texture from the crumbs, just to remind you of the cookies they are made from. They're definitely bites to savor, then make again soon!
Try these other chocolate-y treats:
- Chokladbollar (Swedish chocolate oat balls, an easy and delicious treat)
- Peppermint slice (a no-bake bar with layers of crumb-based base, peppermint icing filling and chocolate on top)
- Chocolate tiffin (another no bake bar with chunks of cookie/biscuit and dried fruit mixed in with chocolate)
- Plus get more snack recipes, both sweet and savory, in the archives.
Biscoff truffles
Ingredients
For filling
- 4 oz biscoff cookies crushed (4oz is about 14 cookies)
- ½ cup biscoff cookie butter
- 2 tablespoon unsalted butter melted and allowed to cool slightly
To coat/decorate
- ½ cup white chocolate chips rounded (you may find you need slightly more, depending on how much you manage to tap off as you dip)
- ½ cup bittersweet chocolate chips or dark chocolate, rounded (you may find you need slightly more, depending on how much you manage to tap off as you dip)
- 1 biscoff cookie crushed
Instructions
To make filling
- Place the biscoff cookies in a food processor and blend to form fine crumbs.
- Add the cookie butter and melted butter, pulse to mix everything well. Remove blade and place the mixture in the fridge for around 15 minutes to help it firm a little.
To form truffles
- Either line a baking sheet/tray with a silicone mat or you can also use a plate that works to go in the freezer.
- Using a small cookie scoop, if possible, or a tablespoon measure, take balls of the chilled filling, around 1 tablespoon each, and use your hands to form in to balls. Place them on the silicone mat/plate then repeat until you have used all of the mixture. Put in the freezer to firm up for around 15 minutes.
- If needed, take the filling balls out of the freezer after around 7 minutes and gently re-form with your hands. If the filling was still a little soft when you formed them they may become a little flattened, but once cooler, you can make them into round balls again.
- As you get towards the end of the chilling time, melt each of the chocolates separately in small bowls. You can either use a bain Marie/double boiler or melt in intervals in the microwave. Either way, take care to just melt, not warm too long. Prepare a baking sheet/tray with a silicone mat or parchment to place the
- Dip half of the filling balls in the white chocolate, and half in the bittersweet/dark chocolate. Dip one at a time in the chocolate, roll or use a spatula, as needed, to coat, then lift out with a fork and rest, tapping edge of bowl, to help allow excess chocolate to drip off. Transfer to the lined baking sheet. Repeat with the other filling balls. If needed, re-freeze the filling balls if they get too soft and re-melt the chocolate if it firms too much.
- Once you have dipped all of the fillings, re-melt leftover chocolate (or melt slightly more) to then drizzle over the tops with a small spoon or the fork you used before. Have the cookie crumbs ready to sprinkle on top immediately after you drizzle. I suggest drizzling white on the dark chocolate and vice versa for contrast. Allow to harden then store in a sealed container in the fridge until needed.
Notes
Nutrition
I'd recommend using a Silicone Baking Mat on top of a Half Baking Sheet to make these. (affiliate links)
See some of my favorite cooking tools and ingredients in the Caroline's Cooking Amazon store.
Remember to pin for later!

Leave a Reply