
This post may contain affiliate links, where we earn from qualifying purchases. See more details in the policy page.
As a Scot, I've always loved shortbread, whether a classic plain or variations like chocolate orange shortbread. I also have fond memories of making jams with my mum, and have made many a jam over the years myself since, like strawberry peach jam and blackberry jam.
So unsurprisingly, making a treat that combines a shortbread-like base and a jam filling is always something I'm up for. And I can be pretty sure you'll want to make some yourself, too (whether you also make the jam yourself, or not).
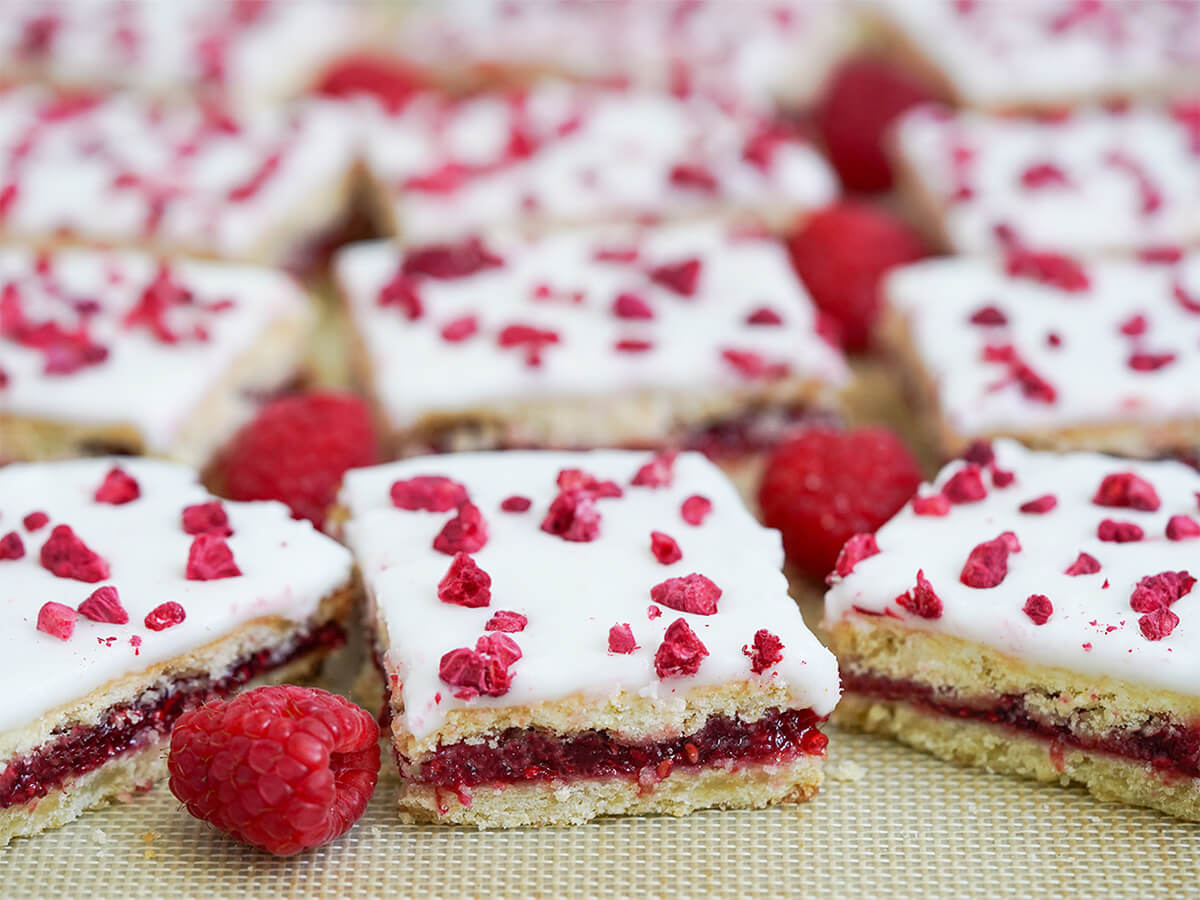
These raspberry slices or bars are such a delicious combination of crumbly, buttery cookie, that sweet-tart raspberry filling and a smooth sweet glaze to top it all off. No wonder they're popular across Scandinavia.

Hindbærsnitter origins and variations
As with many traditional recipes, the origins are a bit debated and unclear. In Denmark, these are called hindbærsnitter which translates as "raspberry slices", but they are very similar to Alexandertorte which you will find in Finland, Latvia and into Germany. The name "Alexander" is after a Russian Tsar, but depending where you are, depends which one you consider it to be named after.
In Finland, "Aleksanterinleivokset" are sometimes said to have been created to honor Tsar Alexander I, who became ruler or Finland, on his first visit to Helsinki in 1818. Meanwhile in Latvia, "Aleksander kuka" are said to honor Alexander III on his visit to Riga. Then you'll also see Danish sources saying Hindbærsnitter have been around since the 16th or 17th century and were loved by Hans Christian Andersen.
Alexandertorte generally varies a little from the Danish version in a couple ways. While it has the same basic layers, you might use different jams and the icing is often colored pink or decorated. The shortbread-like layers can be a bit thicker and more cake-like as they are often leavened.

Ingredients for Danish raspberry bars
These bars are made up of a few components:
- The shortbread-like cookie layers - a simple cookie/pastry-like mixture of flour, butter, sugar, egg, vanilla and a little salt. The egg and relatively high proportion of butter made them nice and rich. While you could use regular sugar, confectioner's/ icing sugar helps the texture be really smooth.
- The jam filling - you pretty much always use raspberry jam, though you could experiment with other flavors. I like to make my own small batch raspberry jam, which is lower in sugar than many bought versions. It's also easy, you just need a little planing. But you can use store bought too.
- The icing - this is a really simple icing or glaze, made with confectioner's/icing sugar and water. I like to use part lemon juice to give it a bit more flavor which pairs really well and also helps it feel slightly less overly sweet.
- The decoration - you typically decorate these with colored sprinkles. However these days many use freeze dried raspberries to keep with the raspberry theme (plus they're less sweet), and so I've gone with those here. Use as you prefer.
While none of the components are difficult, you do need to allow a bit of time for chilling and cooling as you make these, so do keep that in mind. But they're worth the wait!

Tips for making the cookie layers
There are a couple ways to make the base layers, but I find using a food processor the easiest. Just take care not to over-work the mixture - only pulse until the crumbs start to come together, then press together by hand. Flatten the dough into a disc so you have less rolling later.
Make sure you give the dough time to chill properly - it needs at least 30 minutes. While it may be a bit hard to roll at first, it soon softens and it's much better to be slightly firm and dry than soft and sticky. If soft, you may end up adding a lot of extra flour or over-work the dough to try to un-stick it.
If you don't roll it out as perfect squares, don't worry - you can cut bits off and stick them elsewhere. It's more forgiving than you might think. The exact size is not too important either - just make sure both pieces are the same size. Remember, they'll be stacked on top of each other.
Finally, roll and shape both pieces completely before you turn on the oven. Then chill them again as the oven heats up. Being colder helps them spread less, and they'll have warmed as you rolled out.

Putting the layers together
Once the cookie layers are just starting to brown on the edges, take them out the oven to cool. Let them cool around 10 - 15 minutes so they are still gently warm but not hot.
Carefully spread jam all over one piece. Which one doesn't matter, though if one is cracked, make that the bottom one. Spread right to the very edges and as even as you can. Then, slide the other cookie layer onto a tray or something else flat to make it easier to slice from. Turn it over as you place on top to give the flatter bottom side on top.
Then, mix up the icing and spread it on top. Have your toppings ready to add while it's still wet. The cookie should be only gently warm by this point, but if it might be too warm, you can wait a little longer. A little warmth helps it spread, but you also want it to firm up fairly quickly and not just run off. Work quickly to spread the icing and add the topping as it will start to dry relatively quickly.

After that, let the icing firms up before you slice them. You can either chill them or store at room temperature at this stage. To cut the block, use a really sharp, thin knife and go gently.
Serving and storing
You can cut the block into larger or smaller pieces, as suits. I find 12 pieces works well, but you could do 16 smaller pieces. Just bear in mind any smaller than that, you are more likely to have them crack.
To store, you can either keep them at room temperature, if relatively cool, or store in the fridge. Either way, keep in an airtight container. If you need to stack slices, separate the layers with parchment or wax paper.

Each of the layers in these Danish raspberry bars, hindbærsnitter, is tasty in itself, but together they make a wonderfully delicious treat. Yes, they might resemble pop tarts a bit, but believe me that these are so much better. Be sure to give them a try and see for yourself!
Try these other berry-tasty treats:
- Strawberry shortbread cookies (with freeze-dried strawberries in the dough, these have a lovely texture and gently berry flavor)
- Raspberry banana bread (the bursts of berry add a lovely extra flavor and juiciness)
- Strawberry tartlets (mini pastry bases, filled with cream, topped with strawberry and an amazing strawberry sauce over the top)
- Plus get more snack recipes, both sweet and savory, and Nordic recipes in the archives.
Danish raspberry bars (hindbaersnitter)
Ingredients
For cookie-like layers
- 2 cups all purpose flour plain flour
- ¼ teaspoon salt
- ¾ cup confectioner's sugar icing sugar
- 7 oz unsalted butter (7 oz is 14 tablespoons)
- 1 egg
- ½ teaspoon vanilla extract
To fill
- 1 cup raspberry jam homemade or bought, may not need all
For the frosting/icing
- 2 cup confectioner's sugar icing sugar
- 1 tablespoon lemon juice
- 1 tablespoon water or a little more, as needed
To decorate
- 3 tablespoon freeze dried raspberries or more/less to taste, can also use colored sprinkles
Instructions
- Using a food processor, gently pulse the flour, salt and sugar to mix. Then cut the butter in chunks, add to the flour mixture and pulse so you get fine crumbs. Add the egg and vanilla and pulse again a few times so the mixture starts coming together as coarse crumbs, in small clumps. Remove the blade and press the mixture together with your hands. Alternatively, you can mix by hand by rubbing the butter into the flour-sugar-salt mixture to form coarse crumbs. Separately, gently beat the egg before adding it and the vanilla. Mix in gently and bring together.
- However you mix the dough, after you bring the dough together, flatten it into a disc, wrap and refrigerate for at least 30 minutes, but 45 minutes is probably better, so that it firms up before you roll it out.
- Line two baking sheets/trays with parchment paper or silicone baking mats. When well chilled, cut the dough in two equal pieces and re-wrap and chill the one you are not working with. Roll the one out into a square approximately 8 - 8.5 inches square (20 - 21.5cm). If the dough doesn't roll out quite perfectly, you can trim wider edges and stick them elsewhere as you are getting towards the final size and they should stick fine when pressed on and rolled further (though try not to do too much patching especially once it's about the final size). Carefully transfer to one of the lined baking sheets and chill. Then, roll the other piece to the same size and transfer to the other baking sheet. The exact size is not too important, it just gets a little more delicate if thinner, but the main thing is both pieces should be the same size.
- Preheat oven to 350F/180C. As the oven warms up, chill the dough squares further so they are as cool as possible when baked. When the oven comes to temperature, place both baking sheets in oven.
- Bake the squares for approximately 10 - 15 minutes until just starting to become golden brown in color around the edges - they will still be slightly soft to touch but will look dry.
- Let them cool for around 10 minutes so that they are firmer but still slightly warm.
Assembling and glazing
- As you are waiting for the pastry to cool, sift the confectioner's/icing sugar for the glaze into a bowl. Add the lemon juice and water and mix into a smooth paste. It should be gently flowing but not too liquid. If needed, add a little more water to thin it. Break the freeze dried raspberries into small pieces.
- Transfer one of the cookie squares onto a flat tray or board (it can still be on the parchment/baking mat) to make it easier to use on top later.
- If you like, transfer the other square to a plate but you can also assemble on the baking sheet. Spread jam all over the base square, right to the very edges. Make sure you go right to the very edges and make the layer as even as you can.
- Carefully take the other cookie square and turn over so what was the bottom is on top (as it is flatter) and place on top of the jam, matching up with the edges as far as possible.
- If the top layer is still a bit too warm, wait a few more minutes, but as long as close to room temperature, you can now add the glaze over the top. Working relatively quickly, spread the glaze evenly, right to the edges, of the top layer. Sprinkle the freeze dried raspberry pieces (or sprinkles) over the top while the glaze is still wet so that they stick. Leave the glaze to dry completely before cutting.
- Once the glaze has dried, cut with a thin, sharp knife into 12 pieces, or 16 if you prefer a bit smaller (I wouldn't recommend smaller than this as they are more likely to crack when you cut smaller). Store in an airtight container.
Video
Notes
Nutrition
See some of my favorite cooking tools and ingredients in the Caroline's Cooking Amazon store.
Remember to pin for later!

Leave a Reply