This coffee crème brûlée is a delicious mix of rich, creamy custard with a light coffee flavor, topped with a crisp sugar crust. It's easier to make than you might think and a great make ahead dessert.

This post may contain affiliate links, where we earn from qualifying purchases. See more details in the policy page.
I've long been a fan of creamy desserts, and crème brûlée is of course one of the most famous. While my kids don't remember all that much these days from our trip to Paris a good few years ago, they do still remember the crème brûlée in the local restaurant we went to a few times. It was so good we had it I think all three times we went.
So, they already warned me anything I made probably wouldn't be as good. And maybe they're right, so I figured why not start with a slight twist on the classic. At least being different, it's harder to compare. Though I'd still argue this holds it's own pretty well and is delicious in it's own right.
Origins of crème brûlée
"Crème brûlée" (sometimes written as creme brulee if you can't write the French accents) literally translates as "burnt cream" and is a classic French dessert. However it is far from the only dessert in this style, with another slightly less famous being the Spanish crema Catalana which I also love, and it's something you get in the UK as well (or at used to).
All three counties (Spain, England and France) lay claim to being the original creator. The first written French recipe was in François Massialot's 1691 French cookbook, but there are records that suggest a similar dish at Trinity College, Cambridge, in the 15th century. Crema Catalana can trace it's recorded roots back to the 18th century, but it is believe to be much older.
In all cases, the main ingredients in the dish are cream and eggs, making a type of custard. The "burnt" part comes by making a sugar crust on the top. The dishes then vary a little in how you make the custard thicker and how they are flavored.

Ingredients for coffee creme brulee
This coffee version uses broadly the same as a classic vanilla with a slight addition:
- Cream - this is, after all, a rich, creamy dessert and that starts with cream. Use heavy cream in the US, double cream in the UK. In Australia, and elsewhere this might be an issue, be sure to hunt down cream with a naturally high fat content to make it thick as opposed to "thickened" cream which has added ingredients to thicken it. It does make a different to the flavor.
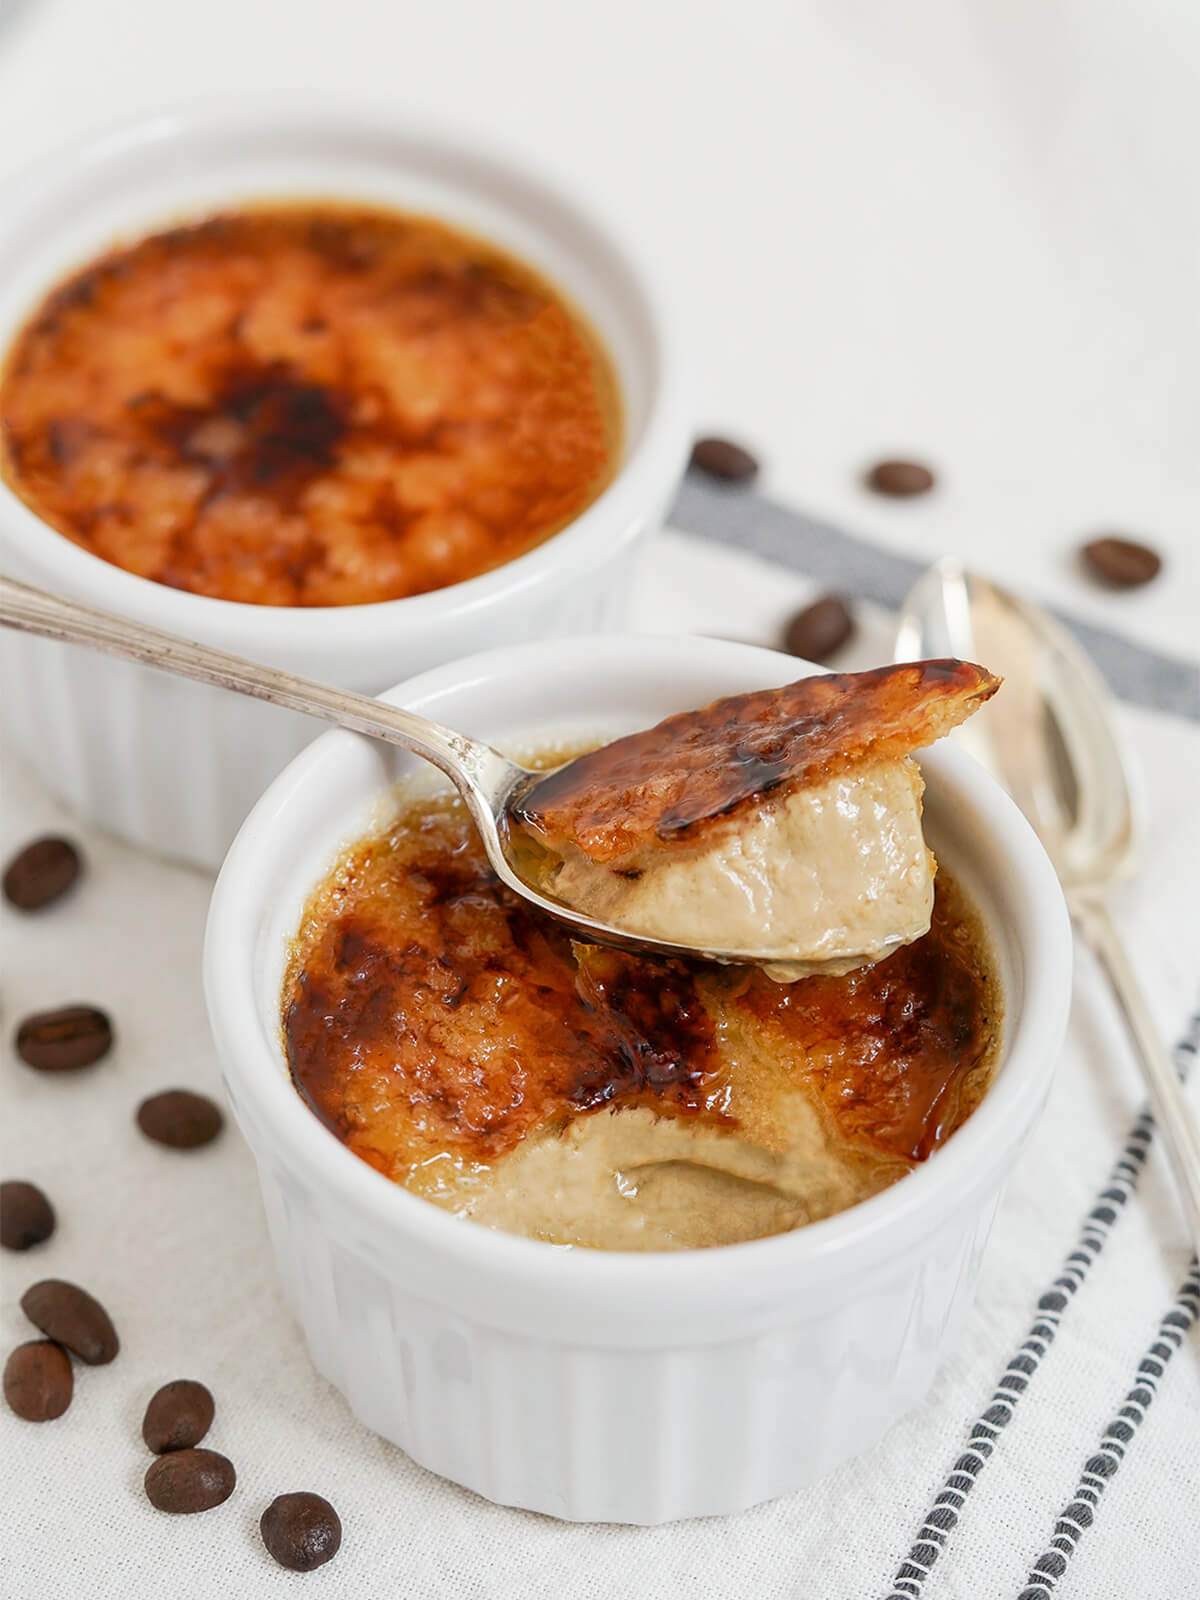
- Egg yolks - these help to set the cream into a custard that's scoopable rather than runny. It's not super thick or wobbly like a panna cotta can be, but just enough to hold it's shape on your spoon.
- Sugar - you use a little in the mixture to gently sweeten the custard, then a little more on top to achieve that characteristic crust.
- Vanilla - even though this is coffee flavored, I still think you want to add vanilla. First, it's a delicious flavor, but it also helps augment the coffee flavor. I recommend either vanilla paste or using a split open vanilla bean for this so you get both true vanilla flavor, as well as those lovely flecks of seeds.
- Espresso powder - this is the best way to get the coffee flavor in there so it really comes through without it feeling unnatural or watering down the cream.
Steps to make coffee creme brulee
For whatever reason, I think this dish always seems more intimidating than it really should as it's not actually that difficult to make. The trickiest bit is probably getting the sugar to caramelize evenly on top (which I admit I'm still working on it being more even - I blame the new torch!)

Crème brûlée comes together in a few steps, with the first being to boil water ready for later on (if you have an electric kettle, that's perfect for this). Meanwhile, gently warm the cream with the vanilla and coffee to infuse the flavors. If you use vanilla paste, you don't need to leave it too long as the vanilla mixes through more easily. You don't want to heat the cream too much as it could separate or not cool enough for the next part.
Separately, whisk the egg yolks and sugar together so the sugar is pretty well dissolved and they become glossy. Then gradually add the gently warm cream. You add it a little at a time to temper the mixture rather than potentially cook the egg too fast.
Then, transfer the mixture to small dishes and place these in a larger dish. Add hot water up to around halfway before placing in the oven. The water helps to ensure the custard cooks evenly without separating.

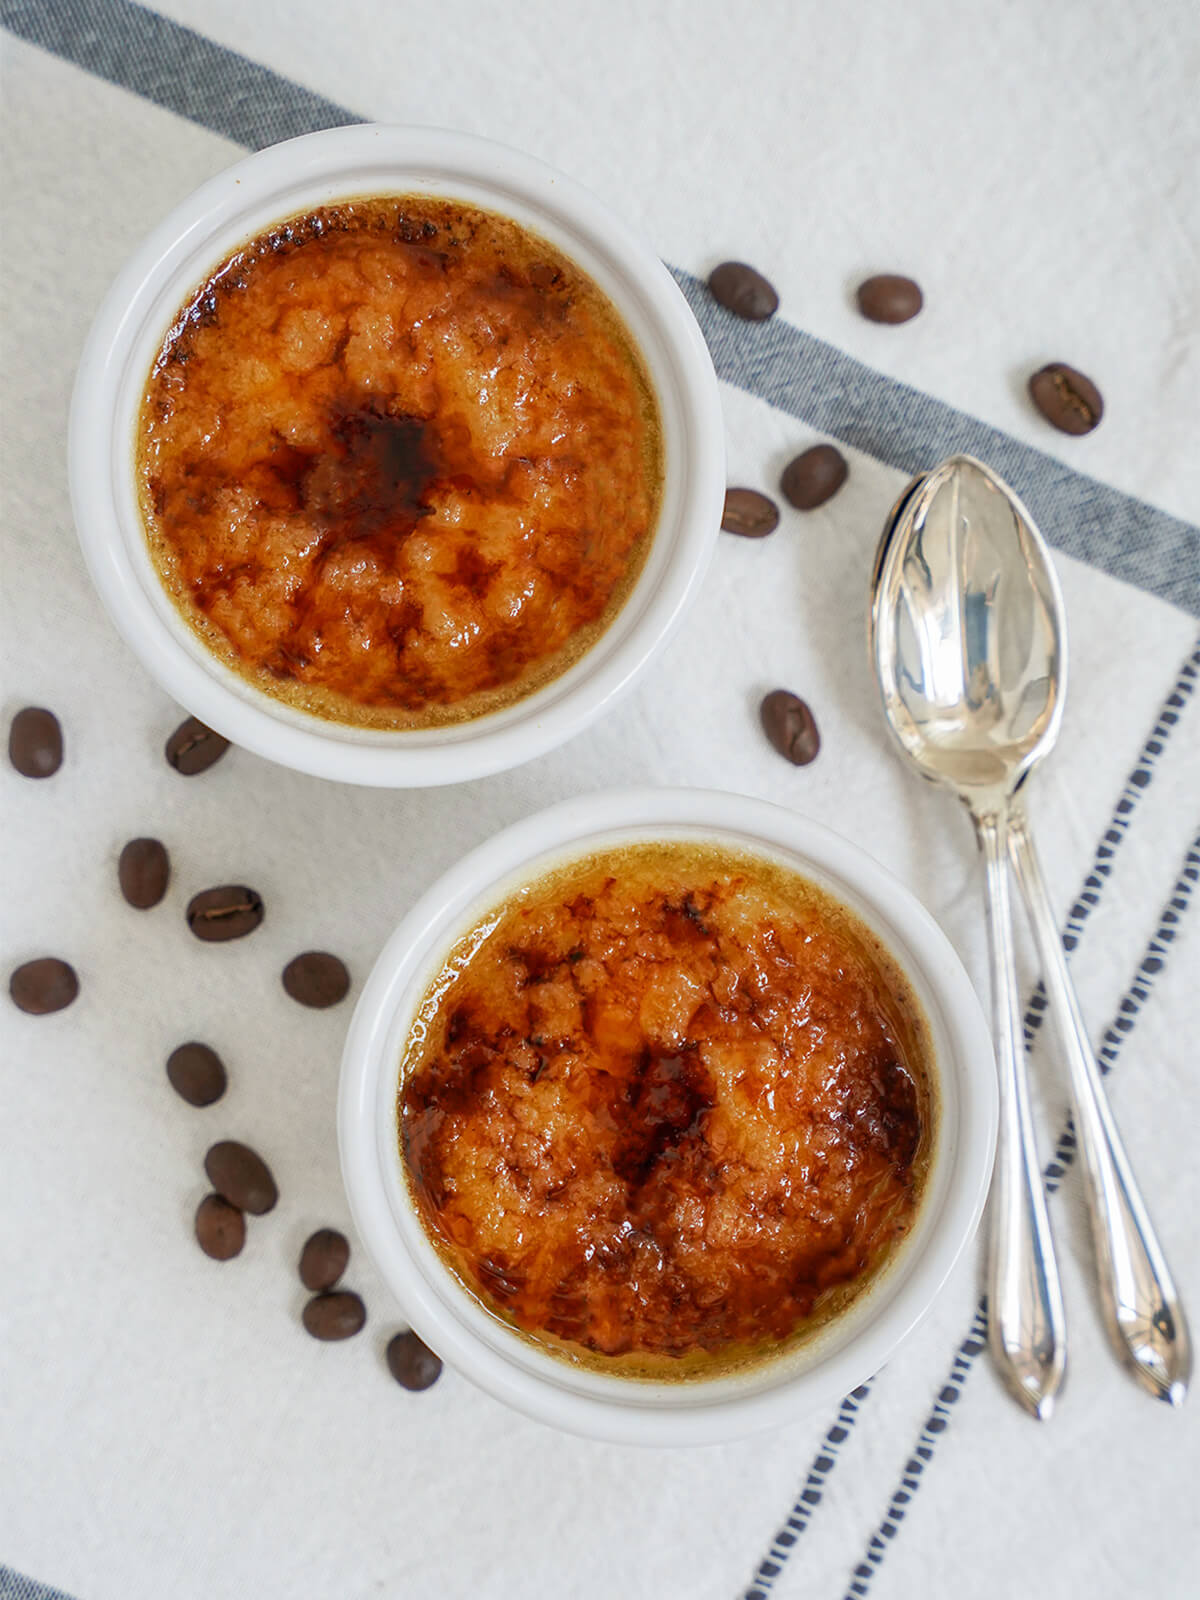
Once set, but still slightly jiggly, you let the custards cool then firm up further in the fridge. Then top with sugar and caramelize it to make the crust. The easiest way is with a small blowtorch, but with fine sugar you can also use an overhead broiler/grill.
What type of dish should you use?
Often in restaurants they serve crème brûlée in relatively shallow, wider dishes which gives you more sugary crust compared to the volume of custard. However, unless you happen to have shallower dishes, then I recommend using small-ish ramekins. They have many more uses (like pumpkin soufflé and strawberry mousse) and still give a good balance of crust to custard.
As well as the small dishes for the dessert, you also need a slightly bigger dish to help cook them. I'd recommend a baking dish that is a similar depth to the ramekins, and just a little bigger. You are aiming for water to reach roughly halfway up the side of the dishes - too far up and the dishes might float or you get splashes of water in the custard. Not deep enough and they are more likely to cook unevenly.

Be patient!
Tempting as it is to rush these along, they work best if you are a little patient. First, you want to make sure you let them cool after baking before you refrigerate as a sudden change in temperature could crack you dishes (and even if not, could impact the texture). So, let them cool to room temperature first.
Then, don't skip the refrigerating time - give them at least a couple hours but overnight is definitely better. The custards will keep firming up as they cool.
Finally, you may want to re-chill them after you caramelize the sugar, depending how you do them. If you manage to just warm briefly, the custard will probably stay relatively cool, but if you need longer with a blowtorch or use overhead heat that takes longer, the custard may warm and get too soft or separate. If so, chill again so it firms up. As long as you don't leave them in the fridge too long, the crust will still be nice and crisp.
The upside of the waiting, though, is that you're great for preparing ahead. Which along with just how tasty they are, and how they look pretty great, makes them great for entertaining.
This coffee crème brûlée is such a lovely variation on the classic creamy French dessert with all that richness and crispy crust you'd expect, along with a lovely coffee flavor. Coffee and cream go so well together anyway, it's a great pairing. Be sure to try and you'll be wanting to make again soon.
Try these other make ahead desserts:
- Natillas (Spanish custard - no crust but instead dusted with cinnamon, it's easy and so comforting).
- Chocolate panna cotta (a deliciously rich variation on the set, creamy dessert).
- Mango pudding (a lovely fruity set dessert that's flavorful, smooth and cooling.
- Raspberry fool - an easy creamy dessert with bright fruit swirled in.
- Plus get more dessert recipes in the archives.
Coffee crème brûlée
Ingredients
- 1 cup heavy cream double cream
- ¼ teaspoon vanilla paste or use ½ vanilla pod
- 1 teaspoon espresso powder
- 2 egg yolks
- 2 tablespoon sugar (fine/regular will work)
For caramel layer
- 2 tablespoon sugar (fine/regular will work, or slightly more if using wide dishes)
Instructions
- Either boil an electric kettle of set a pot of water to boil ready for later. Preheat the oven to 300F/150C. Have two ramekins (or more if scaling the recipe) ready and a baking dish or similar that they can sit in to hold water around the ramekins. (The ramekins I used are around 3 ½ inches (9cm) in diameter and 2 inches (5cm) deep.)
- Gently warm the cream with the vanilla paste/pod and the espresso powder over a medium-low heat in a small saucepan to infuse it. If you are using a vanilla pod, split it open and scrape the seeds into the cream and also add the pod. The mixture should become gently warm but not boiling (small bubbles around the edge are fine, but stop if that happens). Remove from heat and let cool to lukewarm. If you used vanilla paste, you don't need to let it infuse really, so you can also warm a little less, but with a pod it's worth infusing for a good 5 minutes or more. Then remove the pod from the cream and discard.
- Meanwhile, whisk together the egg yolks and sugar in small bowl until it becomes paler and glossy.
- Temper the egg mixture by adding a little of the warm milk to the egg mixture, whisking as you go to ensure you don't get scrambled egg lumps. Keep adding a little more at a time, whisking continuously as you do so, until all the cream is added. Mix to ensure all is well combined.
- Divide the custard between the ramekins and place them in the baking dish. Open the oven, place the dish on the shelf then add the boiling water in the dish, taking care not to get any in the ramekins. You want to add enough water to be roughly halfway up the side of the ramekins. Close the oven and bake for approximately 35 - 40 minutes until the custards are set but still have a slight bit of wobble/movement when you gently move them.
- Remove the dish from the oven and let cool a couple minutes then carefully remove the ramekins form the water with tongs or similar. Let them cool to room temperature then cover each dish (eg with cling wrap/film) and refrigerate at least 4 hour, or even better overnight. They can be kept in the fridge 2 days at this stage without any issue.
- When ready to serve, unwrap and sprinkle sugar in a thin layer over the top. Use a blowtorch or place until an overhead broiler/grill to caramelize the sugar - make sure you pay close attention as it can quickly burn. If the custard underneath gets too hot (particularly if you put under broiler/grill), you might want to chill in the fridge again for another 20 minutes or so to help it firm up again before serving, so keep that in mind in when you prepare the sugar top.
Video
Notes
Nutrition
See some of my favorite cooking tools and ingredients in the Caroline's Cooking Amazon store.
Remember to pin for later!

Leave a Reply