

Swedish cardamom buns are like a cross between a cinnamon roll and a pull apart bread. They're light, packed with delicious flavor, and a beautiful addition to any coffee table.

This post may contain affiliate links, where we earn from qualifying purchases. See more details in the policy page.
Every year, I do some digging on traditional cookies and breads for the festive season. In general, I manage to make at least a couple (like alfajores, kolache cookies and panettone in previous years).
Of course, I always have some I don't quite get round to making. Well, at least it gives me ideas for another year, I guess. I think these pretty sweet rolls have gone in and out of my list for years, and this year I finally got round to making them.
To say I wish I'd made them sooner, would be an understatement.

I've always been a fan of cardamom (or cardamon as we would write it in the UK). Sure, cinnamon is wonderful as well but cardamom often seems forgotten in comparison. Yet it has such a wonderful, delicately warm flavor.
Thankfully, it seems to be better recognized in some places, like Finland and Sweden where things like 'pulla' bread, cardamom cake and these 'kardemummabullar' (cardamon buns or rolls) are popular treats.
These sweet little buns are perfect with your morning coffee, and you can imagine having your own Swedish Fika at home. I think they are perfect to share with guests for something that bit different but so easy to like, too.
Maybe make a kladdkaka (sticky chocolate cake) or chokladbollar (Swedish chocolate oat balls) as well if you want some variety!
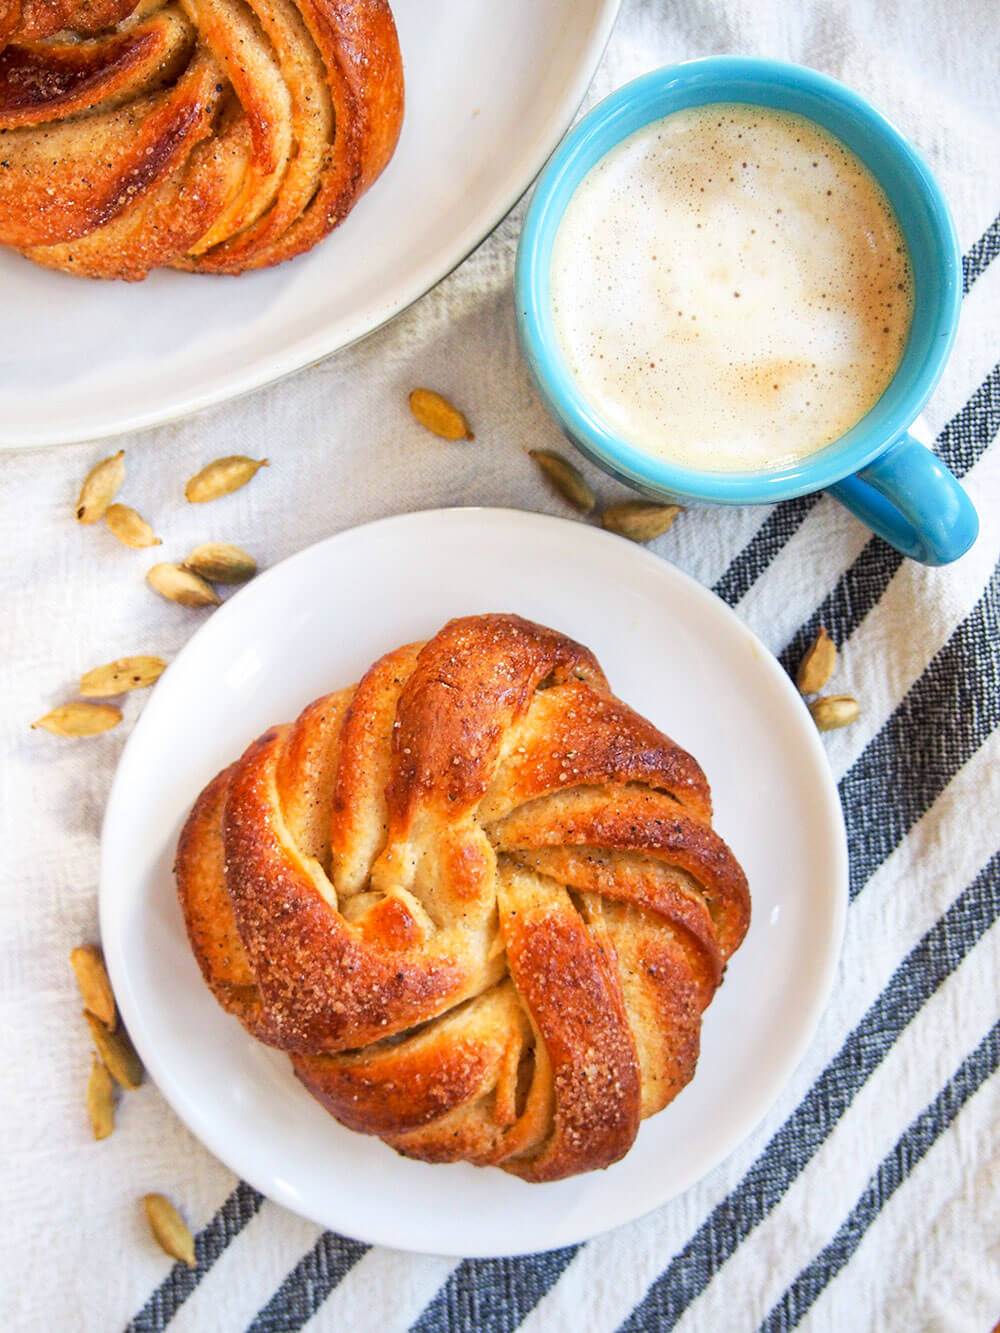
Variations in Swedish cardamom buns
You'll find a few slight variations in how to make these, but essentially they have two core components:
- a cardamom-infused, butter-enriched yeast dough;
- a sugar, butter and cardamom filling.
Some give them an eggwash, and sometimes add a little more sugar on top, while others glaze after baking and add cardamom sugar then. Either way, the idea is to show off the beautiful twists of dough.

Small batch buns!
Most recipes I've found make a huge quantity, which I understand to a point when you are making a yeast bread, you want to get your money's worth from that waiting time. The only thing is these are definitely best fresh and we just don't need 20 of them at a time, and I bet we're not alone there.
So, I have created a recipe that makes 6 cardamom buns which to me is perfect for a small group to enjoy in one sitting. If you need more, you can multiply up the quantities.
If you do have leftovers, you can store in an airtight container and use the next day. I'd recommend warming them either gently in the oven, or simple wrapped in kitchen roll for a short burst in the microwave (I found 15 seconds on 90% was good). You can also freeze them and defrost before re-heating.
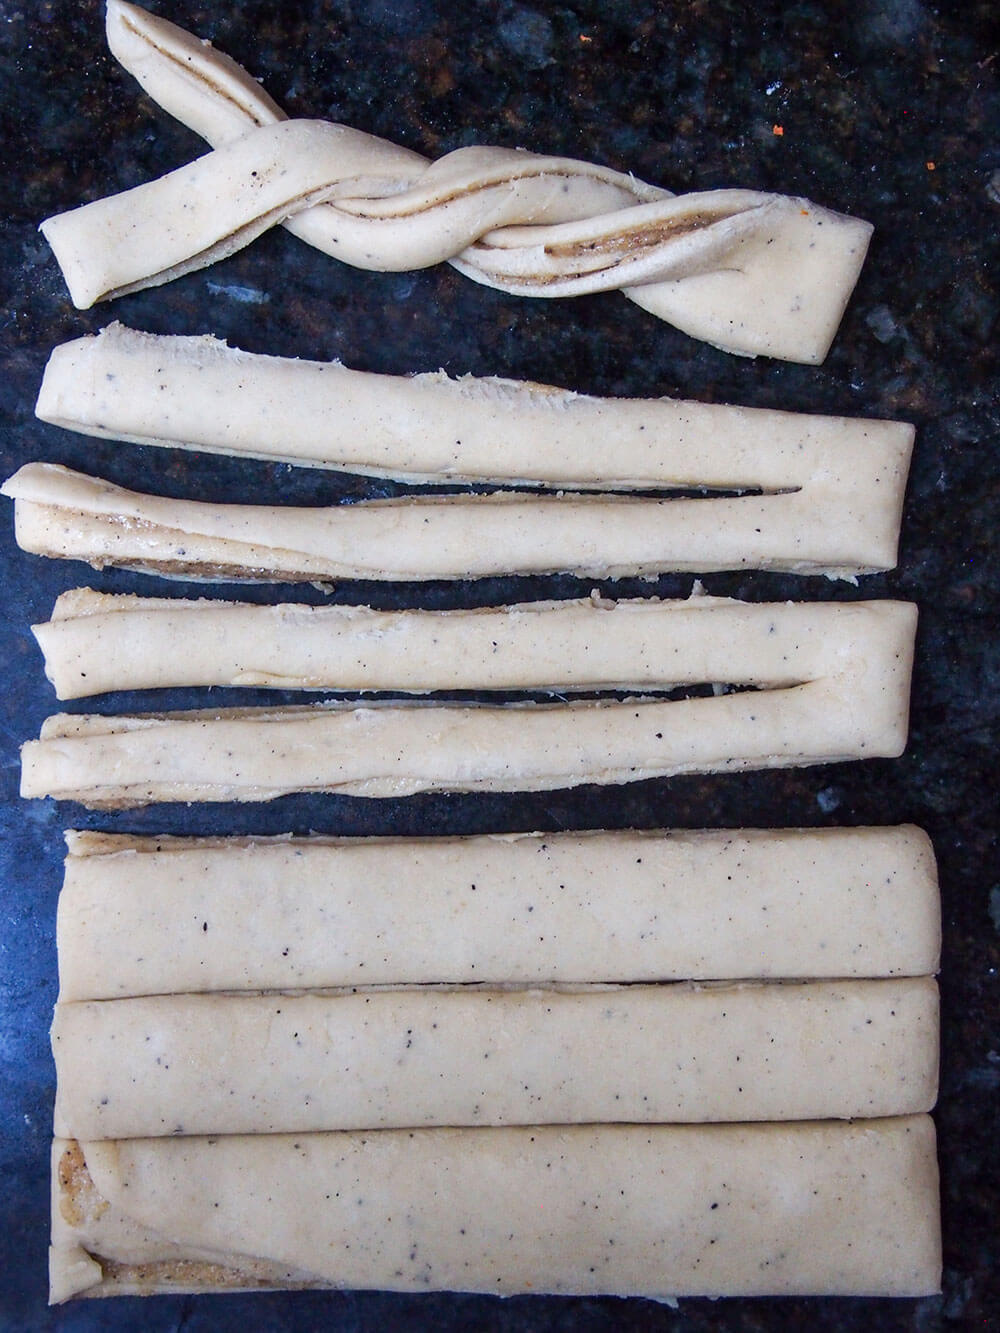
How to twist Swedish cardamom buns
While there is a bit of waiting for these to rise, they are not difficult to make. If any bit could be called tricky, though, it would be forming them in to the twisted buns you see here. I found a few different methods and played around to come up with what I have done here which I think is about the easiest.
You basically make two 'legs' that you twist together, then tuck one leg-end into the bit where the legs join, and twist the other over the top and into the middle of the knot you have formed.
I've demonstrated it in the video, below, so do take a look! Honestly, it's pretty easy once you get in to it.
You'll find the dough easy to roll out - it shouldn't be sticky, but instead relatively dry to the touch. However the butter in there, in particular, keeps it nice and soft and adds richness to the flavor.
The bit that makes the twisting tricky, if anything, is you get little bits of sweet, sticky butter coming out on your fingers. But, believe me, it's worth it.
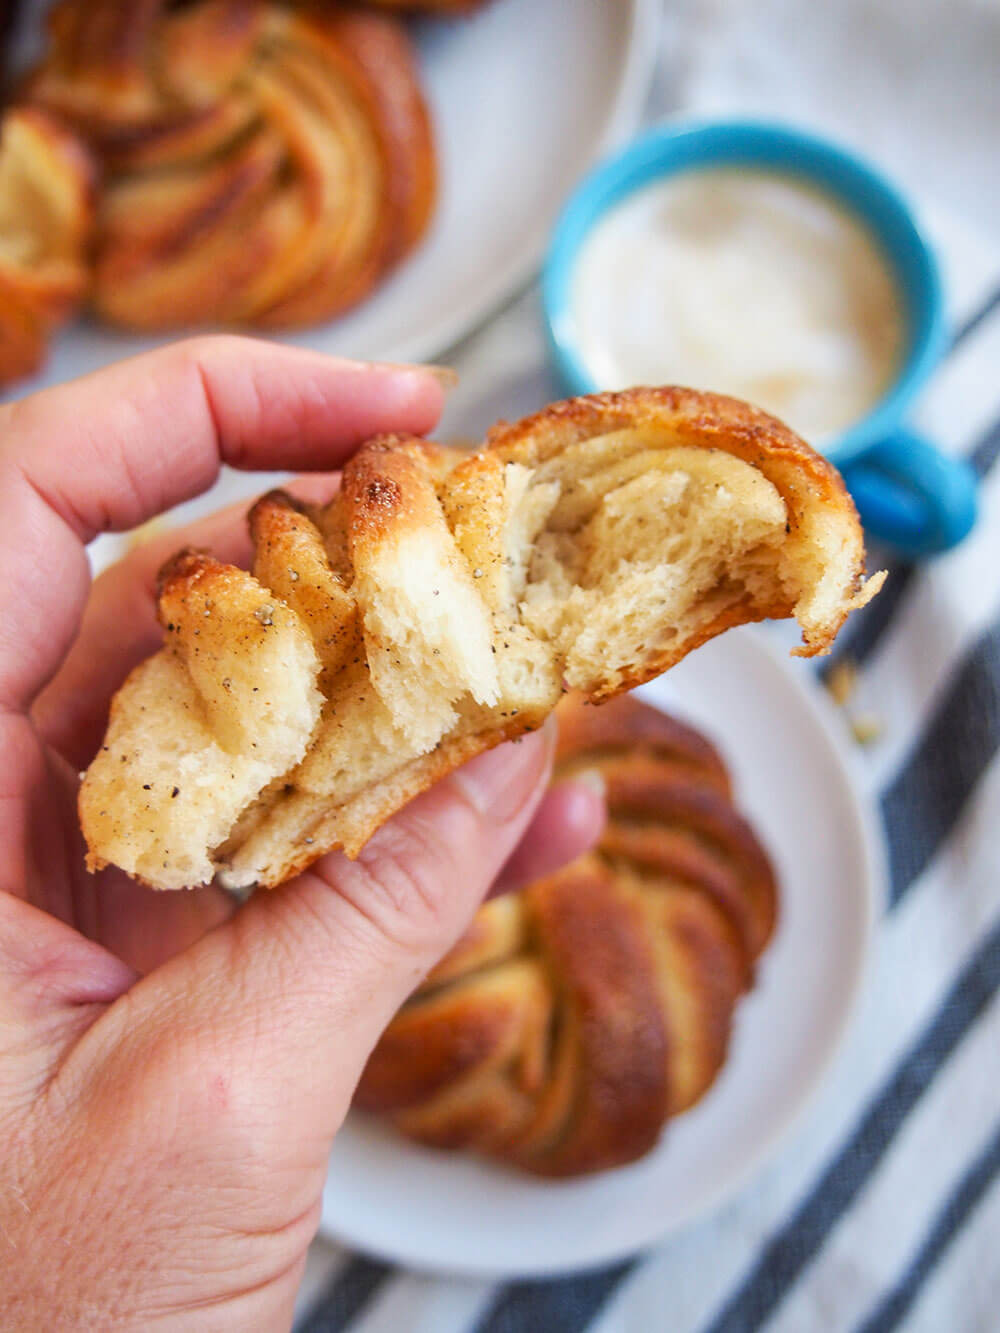
We all loved these and I can definitely see them making a more regular appearance. With a delicious flavor and texture, they're definitely a treat you need to try.
Try these other tasty baked goods perfect for mid-morning coffee:
- Sourdough cinnamon rolls
- Coconut mango scones
- Sour cream mocha cake
- Eggnog cinnamon rolls
- Plus get more snack ideas, both sweet and savory, and Nordic recipes in the archives.
Tools to make these
(affiliate links) I'd recommend using a Half Baking Sheet lined with a Silicone Baking Mat to bake these.
See some of my favorite cooking tools and ingredients in the Caroline's Cooking Amazon store.

Swedish cardamom buns
Ingredients
For the dough
- ½ cup milk
- 1 teaspoon fast acting yeast
- 2 tablespoon unsalted butter softened
- 2 tablespoon light brown sugar
- ½ teaspoon ground cardamom
- 1 ½ cups all purpose flour plain flour
- ⅛ teaspoon salt
For the filling
- 3 tablespoon unsalted butter
- 3 tablespoon light brown sugar
- 1 teaspoon ground cardamom
To top
- 1 egg for eggwash - won't use all
- 1 teaspoon cane sugar approx - or use pearl sugar if you have
Instructions
Forming dough & first rise (40min)
- Warm the milk gently until it just starts to bubble then remove from the heat and set aside to cool slightly. Once it's tepid, sprinkle the yeast over the top and set aside while you prepare out other ingredients.
- Mix together the softened butter, sugar and cardamom. Separately, add the salt to the flour. Mix the butter mixture into the yeast and milk mixture then gradually add the flour. Once combined, turn it out on to a lightly floured surface and knead for around 5 minutes. Note, you can also do the mixing and kneading in a stand mixer.
- Put the dough into a clean, lightly-oiled bowl and cover. Set aside in a warm place for around 40 minutes to double in size.
Mixing filling and forming buns
- When the dough is almost done with it's first rise, mix together the butter, sugar and cardamom for the filling.
- Roll the dough out into a long, thin rectangle, approx 21 in x 7in (52x18cm). Spread the filling evenly over the top then fold the dough to be three layers thick - first fold one third (short end) over to halfway across the rest of the dough, then fold the other side over the top. The layered piece of dough will be roughly square.
- Cut the dough into 6 even strips crosswise (so they are joined on either side), trimming slightly on either end if needed. Then, split each strip in the middle almost all the way but leaving the one side joined (see pics above).
- Take one piece of dough and twist the two strips together, then tuck one end in between where they join, and loop the other end over and through the middle of the loop you have formed. Repeat with the other pieces of dough.
Second rise (30min) then baking
- Put the formed buns on a baking sheet lined with a silicone mat or parchment, cover and set aside to prove for around 30 minutes. Meanwhile, preheat the oven to 425F/220C.
- Lightly brush each bun with egg-wash, sprinkle over a little sugar then bake for approx 12 mins until golden brown on top. Allow to cool for a few minutes before serving (best served warm).
Video
Notes
Nutrition (per serving)
Remember to pin for later!


A says
So easy and delicious!! Made them with active dry yeast, and added a simple syrup glaze when they came out the oven. Also did 400 degrees. Thank you for the thoughtfully written recipe!
Caroline says
Glad to hear they worked well for you! And indeed a glaze can work well if you don't add sugar on the outside before baking.
Henrietta says
Hi Caroline,
I have been dying to make cardamom buns and these have amazing reviews! I'm wondering if this recipe can be made using gluten free flour, and if any changes would need to made to the overall recipe to accomodate this change.
Thanks!
Caroline says
I hope you enjoy them! So I haven't made these with gluten free flour and not all gluten free flours are the same mix and so they can react differently, so you may need a little trial and error in terms of exactly how much flour you need, rise time etc.
Cindi says
Love this recipe! It’s super easy to follow and taste amazing! I think this is user error, so I’m wondering how you are able to keep your filling from oozing out when you are cutting the dough and twisting it? My dough is pretty soft and springy and doesn’t want to stretch without springing back into its previous form. Any suggestions for what I could be doing wrong? Thanks!
Caroline says
Glad you have been enjoying them! If the dough is very springy, then it could be it needs to either rest a bit longer, or else it's too cold, such as if you had it do a longer rise in the fridge. So I'd maybe try leaving it a little longer before rolling out. You can also try rolling and folding over initially so you have the basic shape made, then chill so the filling gets a bit colder before you twist them up - that may help with the filling oozing.
Gabrielle says
Hi! I want to try these! I am confused about the kind of yeast, is it active dry yeast, or instant yeast?
Thanks!!
Gabrielle
Caroline says
Hi, so this is written as fast acting which is instant yeast, which doesn't actually have to be activated in liquid as in the instructions but it doesn't hurt either. You could also use active dry, you just do definitely have to activate that in the liquid. It would be the same amount of yeast but it can sometimes take a little longer to rise. Hope you enjoy!
Fiza Mahtani says
I love this recipe SO much. I've made it twice and the second time I baked it with a chocolate filling to make a babka bun. It takes a relatively short amount of time to prep and bake compared to other recipes so its perfect for me! I would recommend baking at 400F for around 10-11 minutes. I also made a vanilla-sugar glaze to top it off with. I will keep coming back to this recipe over and over again!
Caroline's Cooking says
I'm so glad to hear you enjoyed it, and sounds a tasty adaptation as well.
Kelly G Teel says
We absolutely LOVE these buns! I make them with my “Potato Sourdough Starter Bread” recipe which makes 3 loaves of yummy bread each time I make it. Now I dedicate two loaves to these rolls and share them with my daughter and her family. These are so easy, delicious and I am grateful for this recipe! Thank you! I make these about once a week or every other week they are that good!
Caroline's Cooking says
So glad you have been enjoying them!
Susanna says
I used a very similar recipe before I found this one, but like another poster, I couldn't make the dough rise for some reason. I used dry yeast and after 3 hours put the buns in a warm place. The result was the filling oozing out of the buns when I finally gave up and put them in the oven. Will try again with your recipe and different yeast. Judging by the praise your recipe got, it will be worth another attempt.
Caroline's Cooking says
Hopefully this works out better for you! I would say maybe give longer for the first rise, if needed, but I wouldn't worry too much if they don't rise as much in the second rise (to avoid issues of the filling leaking, as you say). They don't rise a huge amount and as long as they puff out a little, they should still lighten up as they bake.
Ninna says
After having made these countless times, I feel like it's time to comment here. Just adding a piece of information, that it also works fine with unsweetened oatmilk instead of regular milk, and fresh yeast (I use about 15g of fresh yeast for 1 batch) instead of the dry one. The result is always fluffy and delicious <3
Caroline's Cooking says
Thanks for sharing, good to know it works that way too!
GRACE GNIAZDOWSKA says
Thank you I only use fresh yeast so your suggestion was very helpful. I am so tempted to make these and everyone says they are so easy. I can not stand for long because of my spine damage so I am always worried about recipes taking too long. Thank you again.
Caroline says
Hopefully this one works since while it maybe isn't overall that quick, it's a few shorter steps with breaks while they rise.
Ruth Darcy says
I made these and they are easy to make and absolutely delicious. Looks and tastes like it comes from a gormet bakery. My recommendation is to use cardamom seeds and ground them yourself. The flavor is out of this world.
Caroline's Cooking says
So glad you enjoyed and found them easy to make. And I agree, freshly ground is definitely the way to go!
Maddie says
I love this recipe and have made it three times, but I can never get it to rise, even a little. I’ve tried different yeasts, different milk temperatures, and extending the rise time. Any ideas? Could it be because I’m using plant milk?
Caroline's Cooking says
I'm not sure that being plant milk should make a difference, though it can impact the level of hydration so it could be the dough is a little heavier which may make it a bit slower to rise. These aren't something that rises as much as some breads, so it can seem less than you might at first expect, but you should still definitely see some rising. As well as how long it rises, the other thing to consider is the temperature you are leaving it in to rise - is the place you are letting it rise maybe a little too cool? The other option is to put a little more yeast in the dough, though not too much, and see if that helps.
Nina Zauchner says
Actually it works with plant milk just as good, as with regular milk:-) I never noticed any difference.
Also, to make it a bit fluffier, i'd recommend adding 1 egg.
Caroline's Cooking says
Thanks for sharing re plant milk. Egg is less typical in there, but it can add a bit more richness and help structure. Though I admit I do love them as they are.
Sarah says
I've made this recipe 5 times now. Thank you for posting this!
For my batch I'm cooking today- I added sourdough discard. The dough has grown huge. I'm about to pop them in the oven, they went through a second rise, they look beautiful.
My only change - I bring the oven heat down to 374/400 and cook for around 10 minutes.
Thanks again for the recipe!! Sarah
Caroline's Cooking says
I'm glad to hear you have been enjoying, and sounds good with the sourdough in there as a variation.
Ella Starr says
Hello! I am going to make these for a DIY cafe I am hosting in my home- I can't wait.
One question: Is it possible to let the dough rise over night and bake it the next day? I don't have time to do it all in one sitting. When is a good spot in the recipe steps to let it sit overnight?
Need answer ASAP thanks!
Caroline's Cooking says
So I haven't made these leaving overnight myself but I would say doing the second rise in the fridge is the best and should work fine. Just form the buns, place on baking sheet, cover and refrigerate. Then take out to come to room temperature and potentially rise a little more as you heat up the oven.
Elizabeth Parker says
The cardamom buns were delicious!! Many steps, but they came together quickly and easily. They look beautiful too. My only change would to lower the oven temp to 400, 425 seemed a little hot. Thank you
Caroline's Cooking says
So glad to hear you enjoyed them and they came together easily!
Heather Reed says
I have been to Norway and discovered cardamom buns! They are delicious! I can say with honesty that these are even better than the ones I purchased in bakeries in Norway! The recipe was easy to follow and method for twisting the dough was accessible and mine were beautiful!! Will be making these for many years to come!
Caroline's Cooking says
So glad to hear you enjoyed and they measured up well against what you had in Norway!
Teo says
Simply amazing. I first tasted cardamom buns at a local bakery and I honestly thought it was a special recipe they had. But then I found this gem and I can honestly say they taste exactly as the ones in the bakery.
Caroline's Cooking says
So glad to hear that - they are truly delicious, indeed, and glad this recipe matched up for you!
Clara says
These were great! I used the x2 recipe, and baked half after dinner. Kept the other half (dough) in the fridge and baked them in the morning.(For those of you who are interested: I got it out of the fridge and left it on the counter for about 30 minutes before I baked them.) So delicious. The bread was very moist, and I am thinking about using the same recipe for cinnamon rolls, too (the bread for my go-to recipe (Laura Vitali's cinnamon rolls) is not as moist as this one). Thank you, Caroline!
Caroline's Cooking says
So glad you enjoyed them, and agree they have a lovely soft, moist texture.
Walter says
Love these, making them for a second time this morning. A quick question, do you really want to layer the filling over the whole rectangle of dough? I am thinking it should be more like making croissant where you place filling/butter over two thirds of the dough, that way you are not folding a layer of filling directly on top of a layer of filling. Following the directions you end up with a double layer.
Caroline's Cooking says
Glad you enjoyed them! You could, in theory, put the filling only over part of the dough but if you did, you'd want to make really sure you got it as far as the middle where you fold it otherwise you will get sections where you wouldn't have the filling in them. Unlike croissants, you aren't rolling the dough out a lot and spreading the butter filling, so it needs to cover the area you will want filled.
Walter says
Thanks Caroline......I get the part about the difference and not rolling them but does what I said about covering 2/3's then folding the thirds letter style make sense? that way you don't get a double layer of filling in one layer, or put another way even amounts of filling between the three layers of dough.
thank you
Caroline's Cooking says
Yes I can see that - I guess realistically with this level of filling, the difference between the doubled over filling and single is minimal, especially given they are then twisted together anyway.
Walter says
thank you again.....all that aside.....miraculous recipe!!
Stephanie says
The best cardamom bun recipe! I did make some tweaks - added more cardamom to the dough as well as a tad of vanilla bean paste and cinnamon to the butter filling. But using this recipe as my base resulted in an amazing bun - so soft and fluffy. My family said they are the best thing I've ever baked.
Caroline's Cooking says
So glad you all enjoyed them, and indeed you can certainly add a little extra spice to your taste.
Mikke Lindblom says
The very best cardamom bun recipe! I usually make Lusekatter buns for Sancta Lucia, but they're always dry. I tried this recipe...made half with the shown twist shape and the rest in the traditional S shape of a Lusekatter bun. Outstanding!!
Caroline's Cooking says
I'm so glad you enjoyed them! And I admit, I prefer these to Lusekatter too 🙂
Hannah says
These were made spur of the moment when I realized it was Saint Lucia day today! I didn’t have saffron so didn’t make the traditional buns. I made these instead and so glad I did! I added cinnamon and a cream/sugar glaze on top. So good! I’ll be making these again but next time making a cream cheese frosting and walnuts!
Caroline's Cooking says
Indeed, was forgetting it was St Lucia day, but great choice as an alternative (and dare I say possibly tastier even if not as traditional for the day!)
Claudia Bracken says
How do I access the video that shows how to form these lovely buns?
Caroline's Cooking says
So you should see it under "video" in the recipe card - there should be an arrow in the middle of the image that if you click, plays the video. But I know it can on occasion not load or be blocked by certain ad blockers etc. And if so, I have in the past shared on my facebook page which you can see here: https://www.facebook.com/watch/?v=437295720517788
Bean says
Been homesick for winter in Europe and missing cardamom buns. Gave this recipe a try and they came out amazing! Based on other reviews, I did add a pinch of extra yeast and did a longer rise time. Your video of the shaping method was so helpful!
Caroline's Cooking says
So glad to hear you enjoyed them and the video helped!
Hana says
Hello, so excited to try this. Making them now and I am wondering if it possible to freeze some of them & bake when ready to eat ? I would love to have this in the morning over the coming days but freshly baked
Caroline's Cooking says
I haven't done myself yet but in theory yes they should work fine to freeze before baking - just place on baking sheet/tray separated so they don't touch each other, then transfer to a sealed container or bag once frozen. Defrost and let them do a final proof before baking. Enjoy!
broccoli says
i've made these many times and love them! they take me right back to the first time i had them from a bakery in copenhagen!
but the rising times are all too short for me, and i don't keep my house cold at all (plus i live in AZ, so you know it's not cold lol). this time, i doubled the first rise time to an hour or so, and i put them in a slightly warm oven to really try to create the best environment for it, and that worked well. however, every time i make these, they never noticeably rise during the second rise. i debated on just extending that time from 30 minutes to an hour, but wasn't sure if it would make a difference.
do you have any idea why the second rise doesn't seem to make an impact? i do half AP flour and half spelt four, if that makes a difference (i've had no issues with this mix rising in the past tho).
Caroline's Cooking says
Glad you enjoyed them! So I would say that with the filing and shaping (and to a point amount of yeast), they don't rise as much as some other breads, but they should still noticeably puff out a bit before you bake. The flour combination can be part of it - spelt definitely is weaker in terms of the gluten forming ability, so maybe with the shaping etc it's struggling, as it were, to rise properly the second time. I know I suggest fast acting yeast for this, but if the second rise is proving tricky, particularly with the spelt, maybe active dry yeast instead could be an idea to have a little more staying power. With that you definitely want it to bubble up in the milk as in the instructions. The other possibility is that maybe it's rising too much the first time and so overproofing - maybe rather than aiming for doubling, aim slightly less (say 50 - 75% increase) and see if that helps the next rise. Hope one of other of these helps!
DarenH says
Delicious! I added just a bit more cardamom. Suggestion: update the instructions to indicate that the butter for the filling needs to be melted.
Caroline's Cooking says
I'm glad to hear you enjoyed it! Though actually, I don't recommend the butter is melted, just slightly soft so that you can mix in the other ingredients, and as you want to be able to spread it over the dough. If it's melted, it will likely drip off.
Daren hansen says
True, I misspoke! Not melted but VERY soft and spreadable.
Teresa says
HI, I made these today but my dough did not rise. Not sure why as I make bread and pizza a lot. Maybe not warm enough. I followed the recipe, so maybe milk too warm? This then affects them rising in oven. Taste was there, but dough not quite right and come up very small.
Caroline's Cooking says
It's hard to say for sure as there are always a lot of variables. But the milk being too warm does sound like a possibility. These don't rise a huge amount but should be enough that they lighten up and you get those slight layers.
Teresa says
I will make it another day and see how i go. Definitely something wrong as my stomach has not been great since I ate it.
Steve says
Hi - you mention a video about how to shape these but I can't find it in the post. Do you have a link? Thanks!
Caroline's Cooking says
So it should be in the recipe card itself, but I know some screen setups block ads and it may block the video as well. I have also shared it to my Facebook page in the past so hopefully if you don't see in the recipe card you can see here: https://www.facebook.com/watch/?v=437295720517788
Amy says
This recipe turned out great! I liked the simplicity of it, and they were delicious!
Caroline's Cooking says
So glad to hear!
Emi says
Thank you so muchhhhh. I tried a cardamom bun for the first time on a trip to NYC. I had the craving for them and found this recipe. A perfect batch portion I was looking for. This recipe is foolproof. I thought I over kneaded the dough so i let it rise for a little longer and it ended it up coming out perfect. Perfect soft bread. I decided to add a little more cardamom to the sugar filling to suit my taste.
Caroline's Cooking says
I'm so glad to hear it worked well for you!
Meg says
Hello - could I do the second dose overnight in the fridge? Thank uoi
Caroline's Cooking says
Yes. I think that should work, you will just probably want to take them out of the fridge as you heat up the oven, possible a little longer if they haven't risen much, before baking.
Madi says
Caroline, oh my gosh, you are my new best friend. This recipe is amazing! The perfect flavor, not too sweet, so soft, and easy to make. I bake a lot but am not great at yeast doughs so I was anxious, but I have made this two days in a row now, we are hooked. Will I make again tomorrow? Probably!
Caroline's Cooking says
That's very kind, and I am so glad to hear the recipe has been working well for you and you have enjoyed!
Laurie Levites says
Beautiful... but is it my computer, or is the video removed (I see the word "Video" but there isn't one). Also... any use for cardamom extract, or is the ground spice better?
Caroline's Cooking says
Thanks! The video should be there, but it may be there's a slight delay in loading or you could have a setting that blocks the media playing? As for the cardamom - I haven't used cardamom extract, but generally, extracts are made with alcohol or other ingredients to help extract the flavor, so it can make the flavor less 'pure'. Also, it adds extra liquid which may need adjusting for. So I'd generally recommend sticking to the ground spice - ideally freshly ground as it's more intense that way.
Laurie Levites says
Thanks....I am going to make them this coming weekend for new company.. Might need to try them first!
Sophie says
Video didn't load for me either, even in different browsers / after turning off the ad block and refreshing, but I found it after googling: https://www.facebook.com/watch/?v=437295720517788
Caroline's Cooking says
Thanks for sharing - sorry it didn't load but glad you found it shared on my FB.